Loretta Smith
With hatching season starting any day, a common question I hear is, “What kind of Incubator is best?” or “What kind of incubator do you use?” The answer to this question is multifaceted. To be inclusive, many feel that incubation with surrogate hens is best. I have tried that and found success but there is always the recalcitrant hen that decides to break her set mid cycle. So I have moved more toward the use of incubators since I don’t have to wait for them to get broody and they have never broke a set. What kind I use and what kind is best could be 2 different answers. Some will say the antique Leahy Redwood Incubators are best and others will say a new cabinet incubator from Brinsea or GQF is best.
Brinsea on the left GQF on right


I will share my experiences in hopes that you will glean some helpful ideas as you consider what incubator is best for you.
I began my peafowl journey 17 years ago. I purchased my first incubator and didn’t want to break the bank or invest more than I needed to. In my ignorance I got the cheapest Styrofoam incubator which was the most affordable at about $50 and happily set the 11 eggs peafowl eggs and 10 turkey eggs I had purchased.
I had visions and hopes of all my eggs turning into adorable wee peas and turkeys… I faithfully rolled them several times a day and added more water to keep the humidity up. I waited and hoped for all of the eggs to hatch. Excitement was running high for the 28 days of incubation. As the day approached for hatching I was looking intently for signs of wee chicks. The hatch was less that stellar. I think 3 turkeys and maybe 3 peachicks hatched. I was thrilled with the ones that made is but wondered what I could do to improve future hatches. I quickly learned that hatching peafowl was a bigger challenge than hatching chicken chicks and the learning curve would be tough.
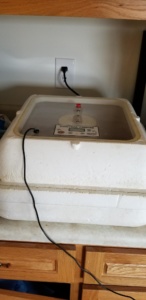
As I began studying incubators and the varying costs of Styrofoam incubators I learned some important things. I tried the still air incubators and some brands were less successful than others. I finally stumbled on an incubator that was working good. Circulating air was critical for a good hatch. With out circulating air the temperature varied from the corners, sides and center of the incubator. This was not conducive for good chick development. I imagine the humidity varied too. Temp and humidity are critical for successful hatching. I tried several brands of Styrofoam incubators and finally found after trial and error that the GQF 1588 Hova Bator with circulating air and with digital readouts for Temp and humidity worked very well for me. I thought I had really arrived. Now I had a “huge” viewing window and could check humidity and temps before I rolled eggs. I even invested in an egg turner and used if for 1-2 hatches but found the peafowl eggs were really to big to use the turner with out sacrificing space for incubation. I used these incubators for years, purchasing a total of 5 since they were very reliable for a beginner. The last season with them I ran all 5 of the incubators. Some were used for incubation for different weeks and one was used for hatching. They would hold close to 40 peafowl eggs but took diligent turning and rotating the location of the eggs. I hatched more than 100 chicks my last year of using them. I had a friend tell me I didn’t need a better incubator if I was getting that kind of hatch from them but I knew there were a lot of eggs that didn’t hatch or that piped and died or simply succumbed during the incubation process.
My last year with these as my sole incubators was 3 years ago when I finally started hunting for a used cabinet incubator. I located a used GQF cabinet incubator and brought it home. It worked good for the price and allowed me to retire the 5 Styrofoam incubators. I actually put them in the basement knowing I might need an ICU incubator for a weak chick so they were simply put on hold as I moved up the ladder on incubation. The cabinet incubator was a nice change. I had all the eggs in one spot and only had to monitor 1 unit for temp and humidity. I liked this incubator and found the hatching tray on the bottom was very handy. It has a 5 gallon reservoir so adding water was only needed weekly. It as a big step up. I used this incubator until later in the summer my husband surprised me by saying it was time to get a good incubator and he bought me a new Brinsea cabinet incubator. I was set. I now have a state of the art incubator. It has lots of bells and whistles. It can be set to special turn cycles, cooling periods, or the shelves can be stopped and the unit used as a hatcher. It has a digital control system and an advanced humidity pump which keeps the humidity stable by pumping water into the incubator when needed. It took time to learn how to handle this hatching machine. The one thing I didn’t like about it was the very tiny water reservoir. It held about 1 quart of water which had to be filled 2-3 times daily since I have the larger cabinet style and it uses more water. After talking to Bill Vinduska about this frustration I learned I could create a 5 gallon reservoir by adding more tubing to feed the water into the chamber which only needed to be filled every 1-2 weeks. This has solved the problem of playing tag with the water and humidity. I love the full length window in this unit.
As for the old redwood incubators, I’ve heard great things about them from Craig Hopkins but I’ve not had experience with them. I did see 2 old ones at a swap but they were in questionable condition one didn’t even run. Since I felt clueless without directions I decided to stick with an incubator that I was sure would run. I hope this brief write up about incubators will give you a little help if you are seeking incubation ideas this season.
Currently (Feb.17th) I have resurrected one of my old Styrofoam GQF incubators to set the first 7 eggs of the season. I don’t normally set the first eggs but these are special from a 1 legged peacock and his hen. I really want to know if he can be a breeder or if he will just be my farm mascot. But that is another story for another day…